Enjoy life now... it has an expiration date.


Showing posts with label solvent. Show all posts

Thursday, January 22, 2009

A Mini Adventure in Colorfix


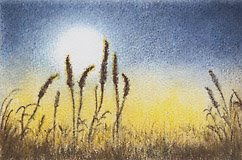
Cattails in the Moonlight


A mini painting on white Colorfix. This is the first time I've used a sanded support. This painting (2 1/4" x 3 1/2") is really only big enough to just get my feet wet with Colorfix. It was interesting. I used a limited palette (which I am liking more every time I use it) and a mix of Prismacolor, Polychromos and Lyra pencils. I made the palette selection based only on color.


To begin with it sure was weird to feel the pencil scraping over that gritty surface. I did a few tests to see if I could get smooth even coverage just using the pencil and I couldn't. Guess if I'd persisted and put lots of heavy layers on I would eventually have filled in the ridges and achieved a smooth look, but I don't want to have to work that way so I tried a few other methods. I first used a short stubby stencil brush and that helped push the color down into the grooves, but I lost my fine lines. Next I tried a Kleenex (okay, it wasn't a Kleenex... I ran out and used bathroom tissue.... Mr. Whipple would be proud) and that smoothed some of the pigment ....... and ground the tissue to a pulp! Next up was The Q-Tip, which performed decently but again, I lost the fine lines (and the Q-tip looked like it had had a really bad hair day by the time I finished with it). Last resort was solvent. Ann at Blue Bird Hill blog had mentioned some time ago that she liked Eco House Citrus Solvent for dissolving cp (thanks for the tip, Ann!) so I ordered some and thought now was a good time to try it out. I liked the scent and it did a good job of give the cp a painterly look. I found out that it doesn't take much - I almost used a dry brush technique - and it does work the pigment down into the crevices. In this project I limited its use to the dark brown grasses in the foreground. Using solvent holds some promise but it's something I need more practice with.


So how do I like the Colorfix? Not sure. It's a very tough surface, erases quite easily (at least for light marks) and seems to strengthen the colors. But unless I use solvent, it still looks grainy. I was looking for something smoother- I'm after a painterly look that I can achieve using just a few layers of cp. Anyone have any ideas?

Saturday, July 19, 2008

Swatches 2


Another little CP experiment...

I want to know what colored pencils are capable of. I also want to know, before I start on a project, how to achieve a particular effect. Hence the experiments. Yes I do plan, at some point, to produce something besides these slightly-off kilter little swatches! But when I'm working on a new piece and mentally juggling things like composition, values, color choices, etc., I don't want to have to stop and do a trial and error thing to get the look I want. So I figure the more I play with colored pencil the easier it will be when I actually begin a new piece. At least I'm hoping it will work that way. For the beginner (me!) these two swatches provide mini lessons in underpainting, burnishing with color, and using solvents.

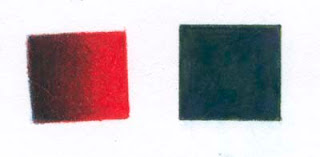
In the dark/red square on the left I started out with a layer of Indigo Blue that faded to nothing on the right side. Then did an all over layer of Tuscan Red, followed by an all over layer of Crimson Red. Finally I burnished the whole square with Scarlet Lake. I liked the richness of the dark... and learned that in order to get really smooth color I have to have a sharp pencil that can get into the recesses of the paper (BTW - using Stonehenge).

The second square is about getting even coverage by using a solvent. Parts of the square were colored with Indigo Blue and Grass Green and spot colored with Violet. I then used a small paint brush to apply a tiny amount of Turpenoid Natural. Then another quick layer of Indigo Blue and Chartreuse here and there. I was pleased with the smooth coverage. No paper left showing through. The scan has made it look uniformly dark, but on the actual swatch there are subtle color variations. I wonder if light colors were used if you could almost get a watercolor effect? I'm not sure the Turpenoid Natural is what I need to be using. I noticed that it left a slight oily film (maybe it needs longer to dry?) that smudged if you rubbed your finger across it. But that's what's nice about doing these little experiments... the object is to learn, not to produce a beautiful work - so if it smudges it's no big deal. But it would be a big deal if I'd spent hours on a piece and then ruined it by accidental smudging. Think I'll try some other form of solvent and see if I still get a residue.

Oh, and one more thing: I read somewhere that if you want a really smooth line you can dip your pencil tip into solvent (just a slight amount) and then draw your line. It really works! Made a very smooth, even line with consistent color.

*Swatch experiments in this post, and previous post, from the very informative book, "Painting Light in Colored Pencil" by Cecile Baird.
Related Posts Plugin for WordPress, Blogger...