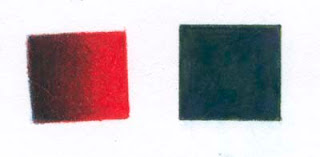
Another little CP experiment...
I want to know what colored pencils are capable of. I also want to know, before I start on a project, how to achieve a particular effect. Hence the experiments. Yes I do plan, at some point, to produce something besides these slightly-off kilter little swatches! But when I'm working on a new piece and mentally juggling things like composition, values, color choices, etc., I don't want to have to stop and do a trial and error thing to get the look I want. So I figure the more I play with colored pencil the easier it will be when I actually begin a new piece. At least I'm hoping it will work that way. For the beginner (me!) these two swatches provide mini lessons in underpainting, burnishing with color, and using solvents.
In the dark/red square on the left I started out with a layer of Indigo Blue that faded to nothing on the right side. Then did an all over layer of Tuscan Red, followed by an all over layer of Crimson Red. Finally I burnished the whole square with Scarlet Lake. I liked the richness of the dark... and learned that in order to get really smooth color I have to have a sharp pencil that can get into the recesses of the paper (BTW - using Stonehenge).
The second square is about getting even coverage by using a solvent. Parts of the square were colored with Indigo Blue and Grass Green and spot colored with Violet. I then used a small paint brush to apply a tiny amount of Turpenoid Natural. Then another quick layer of Indigo Blue and Chartreuse here and there. I was pleased with the smooth coverage. No paper left showing through. The scan has made it look uniformly dark, but on the actual swatch there are subtle color variations. I wonder if light colors were used if you could almost get a watercolor effect? I'm not sure the Turpenoid Natural is what I need to be using. I noticed that it left a slight oily film (maybe it needs longer to dry?) that smudged if you rubbed your finger across it. But that's what's nice about doing these little experiments... the object is to learn, not to produce a beautiful work - so if it smudges it's no big deal. But it would be a big deal if I'd spent hours on a piece and then ruined it by accidental smudging. Think I'll try some other form of solvent and see if I still get a residue.
Oh, and one more thing: I read somewhere that if you want a really smooth line you can dip your pencil tip into solvent (just a slight amount) and then draw your line. It really works! Made a very smooth, even line with consistent color.
*Swatch experiments in this post, and previous post, from the very informative book, "Painting Light in Colored Pencil" by Cecile Baird.

2 comments:
Teresa, good for you, you are being very smart about how you learn with CPs. Well done.
Aren't you the industrious one. I never try anything out first. I just jump in and go. If it turns out, ok, if it doesn't, I trash it. I'm glad it works for you. For me I would get too irritated or bored. I draw fast and lose interest if a picture takes me too long. I was the same way when painting with oils.
Post a Comment