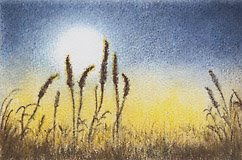
Cattails in the Moonlight
A mini painting on white Colorfix. This is the first time I've used a sanded support. This painting (2 1/4" x 3 1/2") is really only big enough to just get my feet wet with Colorfix. It was interesting. I used a limited palette (which I am liking more every time I use it) and a mix of Prismacolor, Polychromos and Lyra pencils. I made the palette selection based only on color.
To begin with it sure was weird to feel the pencil scraping over that gritty surface. I did a few tests to see if I could get smooth even coverage just using the pencil and I couldn't. Guess if I'd persisted and put lots of heavy layers on I would eventually have filled in the ridges and achieved a smooth look, but I don't want to have to work that way so I tried a few other methods. I first used a short stubby stencil brush and that helped push the color down into the grooves, but I lost my fine lines. Next I tried a Kleenex (okay, it wasn't a Kleenex... I ran out and used bathroom tissue.... Mr. Whipple would be proud) and that smoothed some of the pigment ....... and ground the tissue to a pulp! Next up was The Q-Tip, which performed decently but again, I lost the fine lines (and the Q-tip looked like it had had a really bad hair day by the time I finished with it). Last resort was solvent. Ann at Blue Bird Hill blog had mentioned some time ago that she liked Eco House Citrus Solvent for dissolving cp (thanks for the tip, Ann!) so I ordered some and thought now was a good time to try it out. I liked the scent and it did a good job of give the cp a painterly look. I found out that it doesn't take much - I almost used a dry brush technique - and it does work the pigment down into the crevices. In this project I limited its use to the dark brown grasses in the foreground. Using solvent holds some promise but it's something I need more practice with.
So how do I like the Colorfix? Not sure. It's a very tough surface, erases quite easily (at least for light marks) and seems to strengthen the colors. But unless I use solvent, it still looks grainy. I was looking for something smoother- I'm after a painterly look that I can achieve using just a few layers of cp. Anyone have any ideas?

9 comments:
I think this turned out beautifully! Sanded surfaces do take some getting used to. I find they can offer a more painterly look to the piece, but in a more impressionist way, like pastel works do. And I don't mind, and sometimes prefer, that grainy look. I'd say just keep experimenting. It's all fun!
The results are beautiful.
Jean
Looks great to me. I don't like the sound or feel of the sandpaper type papers. Gimme my old Bristol smooth and let me have at it.
Don't know Colorfix, but the results speak well of it. Well done.
What about drafting film where you can use both sides? I'm not sure that will get you closer to what you want though. I would think Stonehenge or Somerset is more what you're looking for - more of a medium tooth paper where there isn't so much texture.
As to your cattails - love the look! Very misty look like early morning in winter. For just learning to use this paper, I think your results are outstanding!
It looks wonderful, Teresa - I love your Tuscan picture too! To answer your question on my last post - the bird is a robin:)
FABULOUS, Teresa!! What an adventuresome soul you are!! I LOVE the glow in this ... and I'd never know it was gritty .. super work!!! (I hope you're doing okay!!!) MIssing you!
Hi Teresa, Fabulous job! I love the texture of the piece. Sanded surfaces do take some time to get used to. :-)
If you are after a painterly look with just a few layers, the drafting film that has already been suggested will do the job. You will get very dense colour as the pigment goes on full strength. There is no colour to the surface and there is no tooth. Drafting film won't accept many layers but you can work in reverse on the back as well. Other than that, the smooth papers are your best bet. Papers such as Stonehenge that have a medium tooth can leave a small fleck of paper visible unless you burnish, apply an underpainting, use a solvent or apply lots of layers.
I agree with Ann in that I like the 'pastel' look one can get with sanded surfaces. But then I absolutely love art done in pastel so I am a bit biased. :-)
So keep trying different methods. You may find that the method or surface you choose depends on the subject you wish to paint. Coloured pencils are quite versatile so have fun exploring!!
I like the way you have managed to create the haze look to the moonlight, this is a very nice drawing, I'm hoping to use sanded paper on my next drawing of an Elephant, so it was interesting to read your comments. by the way thanks for your comments on my blog.
Post a Comment